I have worked in the manufacturing industry for over 40 years. I was fortunate to have had a diverse experience that included working as an application engineer for two large machine tool distributors. I have also done direct contract work and have experience in the CAD/CAM industry. I was employed as a application engineer teaching the system and writing post processors for the various pieces of equipment that the software powered.
I have taught G-code programming, machine tool macro programming and post-authoring using VB as well as CAD/CAM programming.
During this time I have seen some great and not so great methods used. I realized that the forest-for-the-tree syndrome was active in many of the places I visited as an application engineer. This, in my view, was mainly due to the fact that people were just too damned busy to stop and reflect.
A typical example was a well-maintained and managed shop that had a long-running contract for a job that required a fourth axis. The part was a weldment, and because of this the data on the fixture would not ensure a proper alignment. This required the machinist to indicate each part and reset the polar datum. This was time-consuming — it took about 2 to 3 minutes to do it — and once in a great while it would be done incorrectly.
I discussed it with the machinist and his boss, and they agreed that a probe could help.
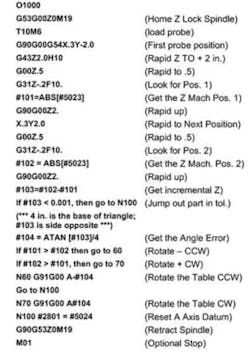
The macro for the probing was straightforward. The logic is to probe the two ends of the piece called for on the print using the Y value programmed as the base, and the difference of the Z distances to calculate the angle of misalignment using trig in the macro. Then, have the macro reposition the polar axis and reset its datum. Now, this sequence took less than 30 seconds and was accurate to arc seconds.
Below is the macro code that would be used on a Fanuc type control. (See Table 1.) Writing for other controls is usually not too different from this. For this example, the distance in the Y axis to probe is 4 inches and the angular error of the fixture is assumed to be less than a few degrees since the fixture would ensure this. The X, Y datum is the centerline of the part; Z datum is the top surface of the fixture when aligned. The centerline of the rotary table is along the X-axis. Clockwise rotation is positive and counter clockwise negative.
Of course, the macro needs to be proven. It has been a while and I composed this from memory. I am 99 percent sure it is accurate — and never would be 100% sure until I prove the macro on the machine. An extra pass also should be added to the script via a loop routine, or simple cut and paste, to ensure that the adjustment is correct.
Since the routine was put into effect at the shop previously mentioned, and went from 2 or 3 minutes to less than 30 seconds, you can see how quickly the money spent on the probe and training was recouped. The 8-hour output was 11 pieces per shift. They are saving 2 minutes per cycle, and that’s a total of 22 minutes per day, 110 minutes per week, just short of 2 hours.
The lot sizes range from 100 to 150 per lot. It takes just over 2.5 weeks to run the lot, and the shop has saved over 4.5 hours. At $60.00 per hour of shop time that’s $270.00 saved, and a much less stressed operator, who also was tasked with doing manual milling tasks and now could perform both assignments much more easily and accurately.
By the time I was done with the training and implementation, they were already discussing buying another probe to be used on a different machine in the plant. This is an example of being too busy to examine alternatives or improvements in a process. The technology of the probe was known to these folks; it’s just that they couldn’t envision the application of it to the process, or that they thought the system too complex to correct in such a simple way.
I hope this article has caused readers to think about using technology at hand to its fullest potential, and in the second installment I’ll take a similar approach to consider how CAD/CAM software can be put to greater advantage.
Read the author's follow-up report on available resources and references that help machine shops improve productivity and the bottom-line performance.
Arvin Cook has been active in precision manufacturing for over 40 years, including work as an application engineer for a large machine-tool sales organization, and a contract tool maker for the Scientific Instrumentation Shop of Harvard University’s School of Engineering and Applied Sciences.
Contact him at [email protected]
About the Author
Arvin Cook
Contact him at [email protected]

