An important part of keeping equipment running smoothly is regular monitoring and maintenance to ensure the machinery is properly aligned. Misaligned shafts and belts on rotating equipment can increase the risk of costly, unplanned downtime. Misalignment can also damage seals and couplings and lead to subsequent lubrication problems. In these situations, correcting shaft or belt misalignment is the only way to forestall future seal failure and associated loss of lubricant.
When shafts or belts are improperly aligned the load on them increases, potentially resulting in a range of problems that can have a direct impact on a company’s bottom line. These problems include:
• Increased friction, which can lead to excessive wear, excessive energy consumption, and the likelihood of equipment breaking down prematurely;
• Excessive wear on bearings and seals, resulting in premature failure;
• Premature shaft and coupling failure;
• Excessive seal lubricant leakage;
• Failure of coupling and foundation bolts; and
• Increased vibration and noise.
To help prevent these potential problems, SKF offers these tips:
1. There are basically two kinds of shaft misalignment: parallel (or offset) misalignment and angular misalignment. With parallel misalignment, the center lines of both shafts are parallel to one another, but they are offset. In angular misalignment, the shafts are at an angle to one other. You must consider both possibilities when checking for misalignment.
2. Don’t rely solely on visual inspection to check alignment. Dial indicators are somewhat more accurate, but don’t provide real-time values to help technicians to measure and attain correct alignment simultaneously. Instead, dial indicators must be removed and reinstalled after each alignment adjustment is completed. Neither method provides the level of accuracy required by much of today's precision machinery.
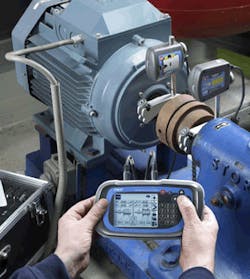
Today’s laser-guided tools are quick, easy-to-use and accurate. They typically consist of two units that emit and detect a laser beam, and a handheld control device. The handheld device displays real-time coupling and foot values (which indicate moveable machine foot positions to facilitate corrections) during the alignment process, eliminating the need to remove and reinstall the measuring units after each adjustment. In addition, the laser system tool documents the values, which can be downloaded to a computer and used to benchmark future alignment inspections.
3. When inspecting for misalignment, be sure to account for “soft foot,” a condition where one foot of a machine does not sit flat on the base plate. Shim plates generally can be used to bring machines back into alignment.
4. Institute an ongoing alignment maintenance program to document alignment conditions before a machine is removed from service and to make sure any misalignment is properly detected, analyzed and corrected.
SKF develops and supplies laser-guided shaft alignment systems. Its TKSA 60 and TKSA 80 shaft alignment systems are designed for novices as well as experienced users. Each provides a complete built-in alignment process that takes users from preparation and evaluation all the way through to correction and documenting the results achieved. Each system’s built-in wireless module will eliminate the need for additional cables and devices, creating a faster, more efficient tool to collect the necessary alignment data.
Complementing TKSA 60 and TKSA 80 shaft alignment systems are the laser-guided TKSA 20 and TKSA 40 utilities. The TKSA 20 is an easy-to-use shaft alignment tool designed for beginners or experts, while the TKSA 40 offers a graphical interface and additional features, such as the ability to check alignment using pre-installed or user-definable tolerance tables built into the system.
About the Author
Robert Brooks
Content Director
Robert Brooks has been a business-to-business reporter, writer, editor, and columnist for more than 20 years, specializing in the primary metal and basic manufacturing industries.
