Flexibility, Precision for Finished Parts Inspection
The standards for precision in parts finished by contract machine shops are increasingly stringent thanks to the specifications and tolerances required by buyers in automotive, aerospace, medical, and electronics industries (among others) for their automated assembly operations. As a result, machining operations are implementing 100% inspection and sorting procedures to achieve near zero defects, commensurate with Six Sigma standards.
For contract machine shops, however, due to the nature of their work, there can be a wide variety of part types and sizes to inspect, in production runs large and small. The challenge is that "traditional" automated, 100% inspection and sorting equipment typically is custom-built for specific parts, and not easily adaptable for changes in the sequence. Manually loaded inspection equipment is more flexible, but it can be slow and expensive, and it opens the door to human error.
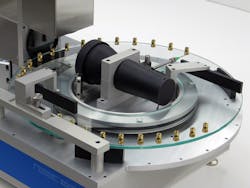
Given the demands of the widening standards, machine shops are seeking more flexible alternatives that can be used to run a variety of parts, and still allow for quick changeover, as needed. With this type of equipment, a variety of small turned, screw-machined, molded or stamped parts up to 4.5 inches long are placed on a rotating glass surface, either manually or using a vibratory bowl feeder.
“Increasing Sigma-level quality is becoming a requirement and is a driving factor for 100% inspection in today’s machine shops,” according to Stephen Kaspari, vice president at Warren Screw Products Inc., a Michigan manufacturer of close-tolerance turned, broached, machined, and assembled metal components supplied to automotive and appliance manufacturers, commercial and heavy-duty truck and agricultural equipment producers, and defense contractors.
“By switching to 100% inspection with more flexible equipment, we gain the ability to run parts manually for as few as 50 pieces, to automated inspection and sorting of more than a million parts at a time,” Kaspari added. “Our Sigma has increased to meet the tightest tolerances, which has helped us win bids as well.”
Flexible, accurate inspection — Kaspari recalled that Warren Screw Products was seeking a method to achieve flexible, high-speed inspection of machined parts with accuracy up to 0.0001 inches, and was not satisfied with traditional techniques.
“Because of variations in turning equipment and raw material, some products can be out of tolerance,” said Kaspari. “But, with manual, end-of-the-line inspection, you may only reach an 80% level of effectiveness [approximately Sigma level 2.5] and will not achieve the goal of ‘zero defects’ to meet automotive industry standards.” Not only that, he added, but manually checking each part for thread presence or pitch diameter is extremely time-consuming and prone to human error.
Although Warren Screw Products was using a mechanical sorting system, achieving tighter tolerances was necessary to get as close to zero defects as possible. To accomplish this, however, the equipment used for 100% inspection had to be flexible enough to inspect a wide variety of parts.
“In total, we run 600 active parts that are all uniquely designed for a customer-specific application, so we needed an ability to switch-over rapidly and flexibly to inspect other parts and part families,” said Kaspari, noting, for example some parts supplied for a new, Chevrolet Corvette transmission. “So, we needed the ability to quickly inspect turned parts, which could share 10 common features yet have a different diameter, neck length, or thread size.”
Kaspari selected a 100% inspection system called the ShadowGage Sorter, from Resec Systems LLC, a Bergenfield, NJ-based manufacturer of automated, 100% inspection sorting systems for small turned parts.
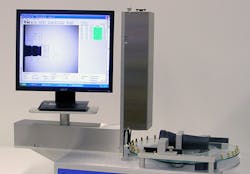
The sorter uses a rotating glass platen to transport, align, measure, and sort the parts. Precision optics and a high-speed LED strobed lamp are used to obtain a gauge-quality image of the moving parts. The parts' dimensions are extracted from the images in a fraction of a second and displayed on a monitor directly over the image. The monitor shows the actual measurements as well as the tolerances.
With the system, inspection of all external part dimensions is possible to an accuracy of ±0.0001 inches at a rate of up to 7,200 parts per hour, and the sorter can be configured easily to inspect different parts.
“Zero defects are required for the automotive market,” Kaspari explained. “So, almost every part we run off our screw machines goes to end-of-line inspection equipment like a Resec Systems unit to inspect for out-of-tolerance pieces.”
Sorting and screening — Kaspari estimated that one machine can perform the inspection of 10 to 15 people doing the same work manually. As a result, the equipment delivered a quick ROI. “With the sorters, we save tens of thousands of dollars annually in labor alone, so we were able to pay off the machines in less than six months,” he said.
The ShadowGage Sorter is offered in two configurations and Warren Screw Products has one of each type operating six days a week, 20 hours per day. Flat-platen sorters are for parts that have a “flat end” and are not too long, so they can stand on their head. Tilted-platen sorters are used for longer parts or those without a flat head. The parts lie “tilted” on their sides on the platen and the unit adjusts the camera angle to provide accurate measurement. With either system, the measurements performed on each part can be saved as an inspection program for the part and be easily recalled at any time.
“We probably have 30 different parts that we run with O-rings on them, and we have to know the O-ring is installed correctly, in the correct location, with only one installed on each part,” he saidi. “For the parts with O-rings, we have had a very high level of success using the equipment to get to zero defects for our customers.”
The ShadowGage sorters can be loaded manually or by using an automated bulk-feed system, such as vibratory feeder or conveyor, to load parts onto the platen. In manual mode, parts are placed on the transport by hand and the sorter does the rest.
Software tools also are provided to perform various types of measurements, which are typically applied to determine part diameters and lengths, chamfer measurements, corner radius, angle measurements, circles and arcs, and threads. The tools can be clicked and dragged anywhere over the outline of the part. Measurements are displayed on screen in a familiar drawing format.
After mastering simple programming procedures, it typically takes about 30 seconds to program a single measurement. So, if a part requires 10 measurements, it will take about 300 seconds, or 5 minutes, to create an inspection program.
“Once you learn the basics of the software tools, they are easy to apply to just about anything,” Kaspari said. “Typically, you pick a tool and drag it over a feature like length or diameter so it is pretty intuitive and easy to switch from one part to another.”
Warren Screw Products typically measures from seven to 20 turned part features in this way, usually involving lengths, diameters, and thread pitch.
Although finish-machining operations may be familiar with traditional part-inspection methods, the flexibility, speed, and accuracy of 100% inspection of precision turned parts can become a competitive advantage that enhances productivity and profitability.


