Machine Tool Accuracy In 3D
By Charles Batesi Senior Editor
Customers rarely order a machine tool from Mitsui Seiki with a particular job in mind. Instead, these shops, mostly in aerospace and medical work, want machines built to specific performance accuracy requirements, no matter what parts are run on them. And often, these machine accuracies are in the millionths-of-an-inch range.
So how does Mitsui Seiki (www.mitsuiseiki.com) know that its machines are meeting the accuracy that is required of them? The company does positioning, repeatability and other tests, and it measures a machine’s 3D volumetric positioning accuracy with a laser vector system, conducting sequential step diagonal measurements.
Developed by Optodyne Inc. (www.optodyne.com), sequential step diagonal measuring indicates how square and straight a machine’s axes move.
Conventional laser interferometer systems test a machine’s linear accuracy: How precisely the machine moves a specific distance in an axis. For example, when a machine is commanded to move 10 in. along its X axis from a zero position, the laser interferometer determines how close to 10 in. it actually moved.
However, according to Charles Wang, president of Optodyne, such a test would not indicate whether the X axis moved up, down, or sideways while traveling to that 10-in. target. He said his company’s system does because it measures a machine’s 3D volumetric errors, specifically those concerning straightness and squareness.
Wang said shops can use conventional laser interferometer systems to measure volumetric errors, but the necessary testing setup is difficult and timeconsuming, sometimes taking days. His sequential step diagonal technique indicates a machine’s volumetric error in a couple of hours because it measures many quantities simultaneously.
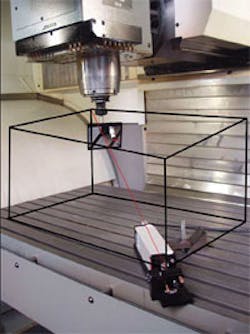
Instead of aligning a laser beam and its reflector/target straight along a machine axis, as with conventional laser interferometer measuring, shops that use Optodyne’s system position the laser beam in a direction diagonal to the machine’s axes. However, instead of moving the X, Y, and Z axes (for a 3-axis machine) simultaneously along the diagonal direction, the sequential step diagonal method requires that only the X axis be moved, then stopped. Data is collected, then the machine is moved in the Y axis. Data is collected again, and the machine is moved in the Z axis and data is collected. These movements and data collections are repeated until the opposite diagonal corner is reached.
If there was a tool in the machine’s spindle, Wang said it would trace a cubeshaped path through the sequential step diagonal measuring process. He also said that moving the axes separately provides three times more data than if they are moved simultaneously as with conventional laser interferometer methods.
“A measuring system that allows us to measure what is happening in a diagonal along three axes of motion is critical for us to qualify and quantify our machines’ capabilities for high-precision,” Scott Walker, president of Mitsui Seiki USA , said. “Most shops are not in tune with 3D volumetric accuracy, which is why it is not used as much as it should be. Machine positioning and repeatability often take center stage over volumetric accuracy,” he said.
Mitsui Seiki takes more than 25 measurements on its machines, then technicians hand scrape and adjust them to eliminate pitch, yaw or roll in their axes.
“The Optodyne system provides us with another way to verify machine accuracy, and our customers drive us to use technologies such as Optodyne’s. My customer base is looking for extremely accurate 3D volumetric capabilities in their machine tools,” Walker added. And he said that machine accuracy is part of almost all customer buyoff specifications.
Skepticism surrounding sequential step diagonal measuring
As more shops demand machine tools with 3D volumetric accuracy, Optodyne’s system continually grows in popularity, but this wasn’t the case when the company first presented its sequential step diagonal measuring technique about 10 years ago. In fact, some of the skepticism continues today.
As with any new technology, shops were hesitant to adopt sequential step diagonal measuring when it made its debut, so Optodyne published several white papers on the subject to educate its potential customers. As a result, some experts in the metrology field questioned two key assumptions Optodyne made in its papers.
The first assumption Optodyne made was that a machine tool’s angular errors usually are small, and therefore, such errors are not a consideration when conducting sequential step diagonal measuring. However, experts questioned what the sequential step diagonal measuring outcome would be if those errors were not small and argued that such a situation could skew the sequential step diagonal measurement.
Optodyne supported its assumption by saying that 90 percent of today’s machine tools have very small amounts of angular errors. In addition, the company worked with several universities that proved, through theoretical research and extensive formulas, that sequential step diagonal measuring is not dependent on a machine’s angular errors, even if those errors are significant.
The second Optodyne assumption that industry experts questioned was that the thermal expansion of a machine’s axes is uniform, meaning the machine is isotropic, or identical in all directions.
Experts argued that each machine axis reacts differently to thermal changes because one axis could be ballscrew driven, while the others could be driven by different means. Thus, each axis could have different rates of thermal expansion.
Optodyne offered a simple solution. If a machine’s axes expand at different rates, shops need to take three additional simple linear measurements after performing the sequential step diagonal measurement to allow for the differences in thermal growth.
