Traceable, Accurate Angular Positioning to ±1 Arc Second
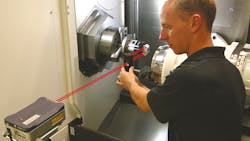
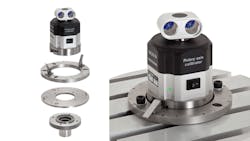
The new XR20-W calibration system measures the angular position of rotary axes to within ±1 arc second, wirelessly, for testing the accuracy of lathes, multi-axis machine tools, mill-turn machines, trunnion tables and spindles. It works in conjunction with related laser interferometers to combine the readings of the rotary calibrator and laser to determine positioning errors in axes under test.
According to Renishaw, the developer of metrology and machine tool calibration devices, its XR20-W rotary axis calibrator is generating positive feedback from users that appreciate a compact design that promotes easier set-up and use. Also, it said the flexibility of the new device is extended by the addition of new off-axis rotary software that allows the XR20-W to be used even when it cannot be positioned directly on the rotary axis under test.
The software calculates true position and records axis performance and errors when compared to the intended target. The test is completed in about ten minutes, and results are sent to a PC via Bluetooth® connection. Users say they can test more and different machine tools than previous calibrators made possible, and Renishaw noted this improves users ROI and delivers a more attractive service to their customers.
“The new Renishaw XR20-W rotary axis calibrator has transformed the way we calibrate rotary axes on machine tools,” stated Tony Morley, president Morley Machine Tool Alignment – a service and maintenance provider in Milton, Wash.
Lightweight, and no cables
“Before XR20-W, our technicians relied on the older Renishaw RX10 units and our in-house designed ‘Morleyometer’ for applications where the calibrator could not be mounted on the center of rotation,” he continued. “While these devices got the job done, they were heavy, cumbersome and slow. Set-up could be challenging, and the associated cables and fixturing meant that great care had to be taken to ensure the test proceeded smoothly.
“Set-up is now quick and easy and the new RotaryXL software is a pleasure to use,” Morley noted. “The XR20-W can even be used in ‘off center’ applications, such as trunnions and head-type five-axis machines.
“The new methodology allows mechanical set-ups to be done quickly with just a simple generic mounting fixture,” he detailed, “allowing a fully automatic test routine to proceed without delay. This tool has enabled us to offer our customers (typically high-end aerospace component manufacturers) an exceptionally high standard of service, and it helped our company grow from just four employees a few years ago to the 20-strong team we have today.”
The XR20-W is lightweight – just over two pounds. That fact and its wireless operation speed setup and eliminate safety hazards created by cables. The devices attach to a rotary axis via a flexible mounting ring assembly, and are centered within ±1 mm (0.04 in.) using a visual aid. Flexible mounting options include an adapter plate for rotary tables with unsuitable center recesses and a chuck adapter for lathes. The various mounting options ensure faster set-up and minimize alignment errors that can lead to measurement errors.
“We have reduced our test setup time by 40% and test run time by 20%,” according to Luke Wang, assistant general manager of the Quality Control Department for Hurco, in Taiwan. “And, the Bluetooth wireless technology allows safer testing, making supervision a non-issue. As a result we do not disrupt shop floor activity, a great boost to our operations and quality procedures.”
About the Author
Robert Brooks
Content Director
Robert Brooks has been a business-to-business reporter, writer, editor, and columnist for more than 20 years, specializing in the primary metal and basic manufacturing industries.

