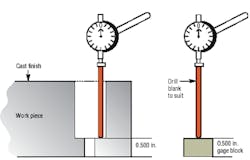
I came up with my idea while trying to check counterbore depths from a cast part surface. I had to hold the depths to 0.500 in. from the part's machined bottom, but a rough cast finish at the top made using a depth mic unreliable. The solution was a drill blank and an indicator.
I placed the drill blank, which would reach the counterbores, between the indicator and a 0.500-in. gage block and zeroed the indicator's reading. Then I inserted the blank into the hole, held it to the counterbored surface, and ran the indicator over the blank. Any reading other than zero showed the depth was off. The indicator was set up in a base that kept its height the same moving from the gage block to checking the part, and both part and indicator base were on the same true flat surface when checking the counterbores.
Nils Bradley
Westerly, R.I.
www.aminfo.biz/402.ad
