Precise measurements must account for temperature fluctuations.
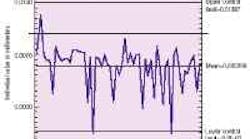
Measurements taken on a crankshaft pin varied as much as 13 microns as a result of environmental temperature fluctuations.
Ambient temperature influences gaging of workpiece dimensions. Compensated gaging accounts for temperature changes.
According to the uncompensated data, workpiece dimensions varied greatly, whereas the compensated data reveals more accurate dimensional measurements.
Precision component manufacturers often ignore the effects of temperature on dimensional measurements. Of course, the issue of thermal expansion is obvious in new machining technologies like dry machining, hard machining, and dry hobbing, which produce extreme temperatures. In these operations, shops can easily identify thermal expansion problems and take appropriate action. However, traditional machining methods produce more gradual thermal variations that shops may be unable to detect without proper equipment.
For example, independent tests conducted by a major automobile engine plant showed that critical dimensional measurements on crankshaft pins were significantly altered by temperature variations in the natural factory environment.
A part was repeatedly gaged some 60 times, at the same station, over a period of approximately two weeks.
The gage used for these measurements was highly reliable and repeatable to tenths of a micron. Because the same position on the same part was measured each time, the only significant variable was environmental temperature, which was responsible for a range of 13 microns of dimensional variation in the group of measurements. Total tolerance in this case was 14 microns.
Gages or machine tool positioning systems used on the shop floor can be compromised by seasonal or daily temperature fluctuations, temperature shifts caused by machining operations, or by the addition of chilled coolants. These conditions can lead to thermally induced measurement errors. Fortunately, temperature compensation systems can correct most of these problems.
Basically, temperature compensation systems take into account temperature variations and customized, individual coefficients of expansion for each element of a measurement system — namely part, master, and gage. In the following test cases, a GageComp -S Single Channel temperature compensation system from Albion Devices Inc., Solana Beach, Calif., was attached to an automotive piston gage.
Uncompensated measurement variation
In the first test, the gage was mastered while ambient temperature was at 19° C. Measurements of the same 99-mm piston were then taken repeatedly while the piston and gage slowly changed temperature over a range of approximately 8° C, from 18° C to 26° C, as the environmental temperature changed.
While the piston and gage each changed temperature at roughly the same rate and by about the same amounts, a significant uncompensated measurement variation of some 14 mm occurred because of the differences in coefficients of expansion of the gage (36.7 parts per million per ° C) and part (18 parts per million per ° C), while the electronically generated compensated dimension showed only a small range of about 0.5 micron of variation. What this test reveals is a correlation with the variations in the ambient temperature, indicating that a fine adjustment to the coefficients of expansion being used by the compensation system might yield even better results.
Mechanical design, mixture of materials used in the fixtures, and the effects of temperature on some electronic transducers all contribute to different effective coefficients of expansion.
Correcting gage dimensions
In the second test, the gage was allowed to drift with ambient temperature, as it would on a shop floor, while the same part was artificially heated and cooled to various temperatures to simulate the effects of machining and chilling. Again, there were significant uncompensated variations, while the compensated dimensions remained relatively stable.
The object of temperature compensation systems is to correct gage dimensions so that they read as if all measurements were made with part, master, and gage at the International Reference temperature of 20° C (68° F), as stipulated by ISO 1.
The results of these tests demonstrate that such systems correct well over 90% of thermally induced error. The remaining uncertainty is due to unavoidable influences such as gage repeatability and reproducibility, the accuracy of temperature readings, and the effects of thermal gradients.
To illustrate the benefits of temperature compensation, one need go no further than an independent evaluation conducted at a major automotive transmission plant. The plant found that using temperature compensation in a large aluminum transmission post-process bore-gaging application improved the process cpk from 0.74 to 1.58, an improvement of over 100%.
