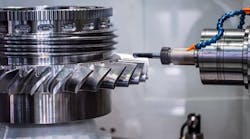
Perfect part origins
There are several ways to locate part origins on sinker and wire EDMs. These are some of the more common methods.
For sinkers, locate as you would on a mill with an edgefinder. Touch off the electrode until it makes contact — CNC’s have automated functions for this — set an origin point from there, and go. However a more common method is to use a conductive probe to locate then set offsets from there. Since most graphite machining is done on machining centers these days, the datum points for all of the electrodes are the same and can be easily calculated. On a wire EDM, the process is pretty much the same. With wire feed on, move the axis until the wire makes contact, divide by half the wire diameter.
Online name,
MitsTech, Central N.J.
Newer wire EDMs have auto edgefind, but on older machines, the machine may overdrive the wire by a tenth or two to get the contact it needs for a reading.
So for a 0.010-in.-diameter wire, for example, move the wire 0.0048 in. instead of 0.005 in. and reset zero. For an even more accurate method, use an oscilloscope to detect the touch point, as that tool is much more sensitive than the machine is. To edgefind with the oscilloscope, put your machine into continuity check mode, run the wire, and jog the table until you see the wave form become distorted. In the continuity mode, I have essentially a positive running square wave about 15 vpp and 20-usec pulse width. There is a stable and synched image, and when I begin to touch the part, the waveform becomes distorted more and more the further I move into the part and gain on full continuity. At full continuity, I have a dead short, and the signal is gone. I stop and take a reading when the signal first scratches the part.
Online name
TheMetalDoctor, San Jose, Calif.
Getting off to a good EDM start

Often, shops experience problems at the beginning of a cut when wire EDMing aluminum when they use a hole popper to put in the start holes. What happens is that the machine continues to increase speed then goes into a short circuit, repeatedly backs off, and eventually the wire breaks.
The cause of the problem is that hole popping in aluminum creates a non-conductive oxide liner in the hole that causes wire breakage. Once a break is made in the nonconductive layer, the machine will cut fine.
Here are some suggestions to remedy the problem:
In the past, I have removed the nonconductive layer using a small file for thin parts, reamed the hole with a carbide reamer, and applied an abrasive cord or jeweler’s saw to mark the side of the hole prior to EDMing. Obviously, removing this layer in a 3-in.-thick piece of aluminum with a 0.020-in.-diameter popped hole will test your imagination. On some tall parts, I have threaded the wire into the hole then manually moved the wire around the wall to establish a conductive spot where I could break through the layer using a manual EDM cut. I then program the machine to cut the hole a few thousandths bigger than the popped hole. Sometimes you can find a spot that is conductive, then operate the machine in manual EDM mode and jog the part a tad this way and that until you have essentially a square hole to start the wire.
Online name
TheMetalDoctor S
an Jose, Calif.
I had to EDM a production run of 6061 aluminum pieces with 3-mm-diameter start holes in each. I stacked five of the 0.125-in.-thick sheets and bolted them with a 10-32 flat head screw. To ensure a good contact, I sanded all the sheets prior to stacking them together. The EDMing cut went smooth and fast for a while, then all of a sudden the wire kept breaking. Changing the burn settings did not help. The problem was impurities in the aluminum, not nonconductive start holes.
Online name,
Rolf B.
Brentwood Bay, BC